
Deciding to learn the guitar is an exciting decision but a very big one.
These tips will help you successfully prepare to start learning the guitar.

Step 1: Choose a guitar
There are a range of similarities and differences between acoustic and electric guitars. These include physical characteristics as well as genre and stylistic tendencies.
 Photo by Sincerely Media on Unsplash
An acoustic guitar has a hollow body and is thicker and bulkier than an electric guitar.
The acoustic guitar has a thicker neck and more space between the strings.
Acoustic guitars are more portable, as all the equipment needed to play it is contained within the guitar itself.
 Photo by Marcos Luiz Photograph on Unsplash
An electric guitar has a solid body and is thinner than an acoustic.
The neck of the electric guitar is often thinner, with less space between the strings.
Electric guitars require more equipment such as guitar leads and an amplifier.
Step 2: Get the right equipment
There are several pieces of equipment that are essential when learning to play the guitar.
Once you've chosen between acoustic and electric you'll also need to choose what brand, style, and price range you want to select your guitar from.
Start collecting your guitar accessories such as a pick, guitar strap, and tuner. This will allow you to learn with less interruption.

Step 3: Learn the parts of the guitar
Before starting starting lessons, you should familiarise yourself with the parts of the guitar. This vocabulary will make it easier to understand what your guitar instructor is asking for and will allow you to move on to more challenging content sooner.

Parts of the guitar:
Body — Use to create sound and facilitate string vibration.
Neck — The neck of the guitar holds the fingerboard and frets.
Headstock — Houses the tuning pegs.
Strings — Vibrates to create sound.
Frets — Frets are the bars you see across the neck of the guitar and are used to stop the string at different points, creating different notes.
Pegs/Tuners — Used to tune the strings to the correct notes.
Nut — Holds the strings at the correct height and sets string spacing.
Fingerboard — Holds the frets.
Bridge — Holds the strings in place.
Pick guard — Protects the body of the guitar from damage and scratches.
Quiz
Which part of the guitar is turned when tuning?
Subscribe for more quick bites of learning delivered to your inbox.
Unsubscribe anytime. No spam. 🙂
Step 4: Identify each string and tune your guitar!
Guitars have six strings. They're placed on the guitar in order of thickness. The thickest and thinnest strings are both tuned to the note E and are two octaves apart. The four middle strings are tuned to the notes A, D, G, and B respectively. See the video below for a breakdown of how to tune each string:
When starting out, it's often best to tune your guitar using an electric tuner. These can be purchased fairly inexpensively at any good music shop.
To see the different types of tuners available check out Guitar Tuners 101: The Ultimate Buyer's Guide.
Step 5: Learn some basic guitar chords
As you learn how to start playing guitar, there are some basic chords that you'll need to learn. These occur over and over again in a range of styles and genres and are important foundational knowledge for any guitar player.
Below is a chord chart that features some of the most common chords to play on the guitar.
The image shows the guitar strings from left to right. The lower E on the left and the high E on the right.
The numbers show which finger to place on each fret of the guitar. Finger 1 = index, finger 2 = middle and finger 3 = ring.
The right hand strums the strings on the body of the guitar while the left hand holds the the chord on the neck (or vice-versa if you're playing a left-handed guitar).
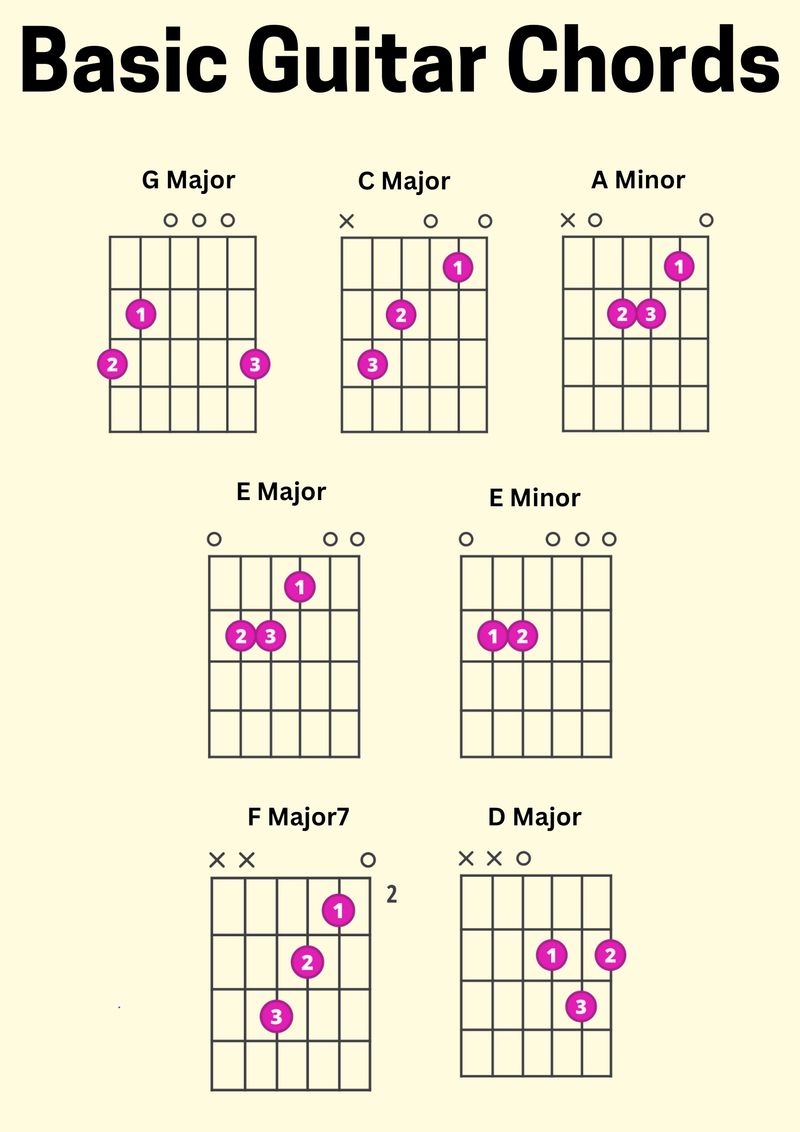 Image created by the author using Canva
For further explanation, check out this video on basic guitar chords
Step 6: Learn some common chord progressions
After you've learned a few chords, it's time to make some music!
A chord progression is the order chords are played in. This varies from song to song however, there are some chord progressions that occur more than others. Listed below are a few common chord progressions to get your guitar playing started and a diagram displaying the chord/scale number relationship:
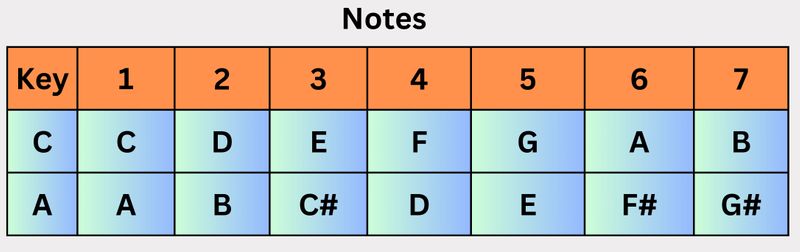 Image created by the author using Canva
Practice the common chord progressions listed below. The numbers indicate which note in the scale the chord is built on. The examples below are in the C major scale:
1 - 5 - 6 - 4 (C major - G major - A minor - F major)
6 - 4 - 1 - 5 (A minor - F major - C major - G major)
1 - 4 - 5 - 4 (C major - F major - G major - F major)
1 - 6 - 4 - 5 (C major - A minor - F major - G major)

Quiz
Now that you've learnt some basic chords and progressions, which activity can you do to practice your new skills? Select all that apply:
Take Action

Your feedback matters to us.
This Byte helped me better understand the topic.