
Are you ready to solve problems like an engineer?
Solving real-world problems with science and technology is never as simple as just coming up with an idea and snapping your fingers!

It takes a lot of trial and error. It involves testing out your ideas to see if they work — sometimes over and over, changing things bit by bit every time.
You might fail multiple times until you find a solution...and that's ok!
It's all part of the engineering design process — a model that will help you design the right solutions to problems big and small.
Why Use The Engineering Design Process?
The engineering design process (EDP) is a framework or guide that engineers use to design or improve:
 Products
updating apps
designing new packaging
Places
making schools more accessible for students with special needs
protecting cities from natural disasters
Processes
cleaning polluted air
programming robots
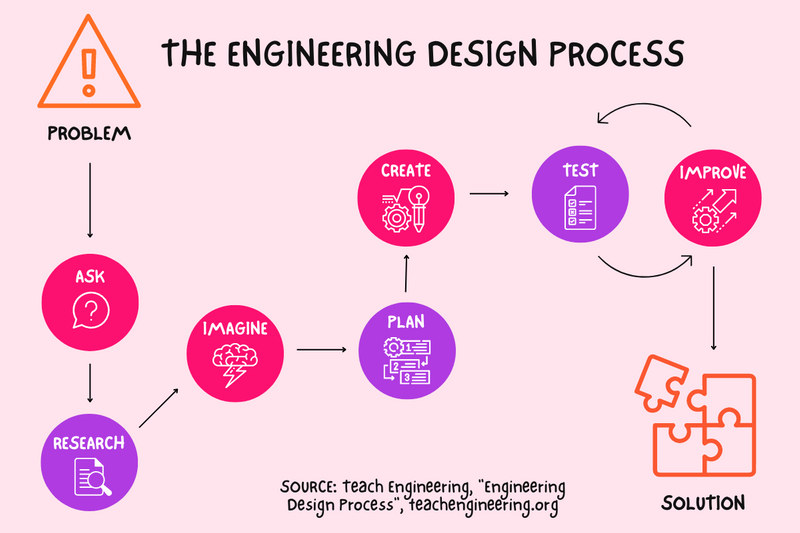
The 7 Stages Of The Engineering Design Process
EDP follows 7 stages to help engineers move from problem to solution:
You can use these stages in class projects to help you solve problems like professional engineers would. EDP will give you helpful practice with the following STEM skills:
starting and planning projects
collecting and recording information
analyzing and interpreting data
communicating observations
It's also especially helpful for keeping group projects on track!
Scenario: Designing A New Science Lab
Your school's science lab needs to be redesigned! Neither students nor teachers like using it for science class because it's outdated and falling apart.
Your school's principal selects you and some other keen science students to help redesign the lab. The principal will give you a budget, provide you with design software, order any materials you need, and hire workers to build the lab according to your design.
How would you use the 7 stages of EDP to work on the project?
Start With Empathy ❤️
 STAGE 1: ASK
You're not just designing a lab for the sake of it — you're solving a real problem that real people face!
Before your team does anything, you need to think about your end-users — the students and teachers who will use the lab.
You need to understand the problems they face so you can empathize with their frustrations about the current lab. This empathy will help you imagine a new lab.
Meet with teachers and students to conduct a needs analysis. Ask them directly:
What problems do they have with the current lab?
What would they like to see in a new lab?
Check out this Byte for a deep dive: How does empathy play a key role in design thinking?
Quiz
Your team just met for the first time to start working on the lab design. What should you do in the ASK stage? Select all that apply.
Subscribe for more quick bites of learning delivered to your inbox.
Unsubscribe anytime. No spam. 🙂
Come Up With Ideas 💡

STAGE 2: RESEARCH
Now you need to learn more about classroom design. Talk to experts and/or do some web searches to find out:
What do labs at other schools look like?
Are there new technologies or classroom design solutions you can incorporate in the redesign?

STAGE 3: IMAGINE
Get your team together and start brainstorming ideas for your new lab:
Encourage as many ideas as you can, even if they seem ambitious or "wild". As long the ideas are focused on the solution, there are no limits at this stage!
Keep track of everyone's ideas so you can refer to them when it's time to choose the best ones.
Check out this Byte to help your team through the imagine stage: How can I facilitate creative brainstorming?
Quiz
In the IMAGINE stage, your teammate suggests that the lab should have an expensive wall-to-wall flat screen that teachers can use for presentations. How should you respond? Select all that apply.
Choose The Best Idea(s) To Work On ✅

STAGE 4: PLAN
Look at your list of ideas for the new lab. As a group, you need to decide which ideas to include in the solution. Ask yourselves:
Which ideas will best meet the needs of our end-users?
Which ones can we build realistically, considering the budget and materials available?
Once you've agreed on the best ideas, you need to decide:
What materials do we need to order?
Which responsibilities will each team member take on?
Check out this Byte: Learn to keep your group project on track
STAGE 5: CREATE
Your goal here is to design a prototype — a basic version of your lab (kind of like the first draft of an essay).
Make the initial lab design and pass it on to the contractors hired by the school. Once they complete the work, you can move on to the next phase: testing!
At this point, the lab doesn't need to be 100% ready. It just needs to be something teachers and students can work with.
Quiz
The prototype lab is now open! What should you do next? Select all that apply.
Put Your Creation To The Test 🎯

STAGE 6: TEST
This is when you answer the question, "Does this lab actually work?" You want to know how close (or far) the prototype lab comes to solving the problems teachers and students identified in the ASK stage.
Put your prototype lab through some tests that simulate real-world conditions — like the class session in the quiz above — then record your observations. Bring in some end-users as well and ask for their feedback.

STAGE 7: IMPROVE
Get back together with your team and review your observations and end-user feedback. How can you further improve the lab?
Rework your design solution to incorporate these improvements and go back to the testing stage with another class session.
You might need to cycle between the TEST and IMPROVE stages several times before your solution is ready.
You want to keep testing and improving it until you can confidently say, "This lab meets the needs of our students and teachers!"
Quiz
The results of your survey show that teachers and students are mostly happy with the new lab. However, 76% of the students agreed that the overhead lighting in the room is too dark. Should you continue working on the lab?
Take Action

Ready to start using the engineering design process in the classroom?
Your feedback matters to us.
This Byte helped me better understand the topic.