
Imagine trying to find one source in a dense list of citations, each one blending into the next. It's no fun to read, right?

The hanging indent changes a wall of text into a scannable reference list.
It's a little detail that makes a big difference in the clarity and professionalism of your research papers. Your readers and your instructor will appreciate it!
Hanging Indents: The Basics
What Are They?
A hanging indent is where the first line is set apart from the other lines beneath it, which are indented. A hanging indent is usually 0.5 inch from the left margin, but this measurement can vary among formatting styles.
Why Are They Used?
In all formatting styles, hanging indents are used to organize references or the annotated bibliography in research papers. Since the author's name is set apart from the rest of the text, hanging indents make the sources easier to find.
This example reference page is formatted in APA 7 style with 0.5 inch hanging indents.
 Image created by the author with Microsoft Word. To hear an audio description of the image, click play on the audio player below:
Did you know?
Hanging Indents in Microsoft Word
Using Microsoft Word's built-in formatting tools, rather than the spacebar, will ensure the hanging indents appear consistently across devices.
Make sure each reference is on its own line, then add hanging indents using one of these four methods.
Keyboard Shortcut ⌨️
Highlight your reference list.
Press Ctrl+T for PC or Cmd+T for Mac.
Ruler 📏
Highlight your reference list.
Drag the bottom triangle of the ruler to the 0.5 inch mark to move all text over.
Drag the upper triangle to the 0 inch mark to move the first lines back.
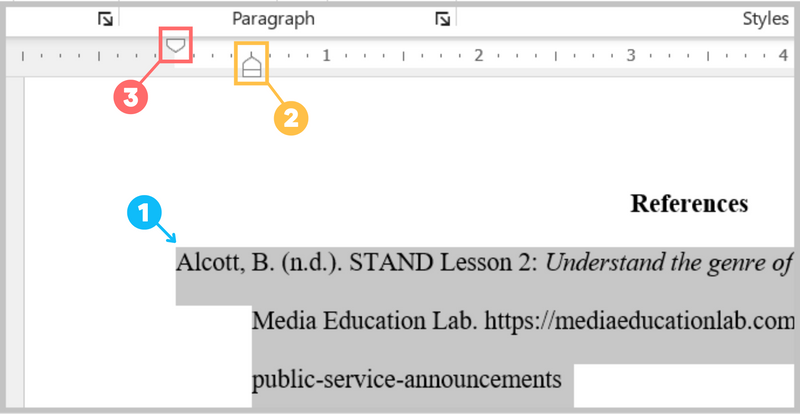 Image created by the author with Microsoft Word and Canva. To hear an audio description of the image, click play on the audio player below:
Paragraph Settings 🖥️
Highlight your reference list.
Select the small Paragraph Settings button in the right-hand corner of the Paragraph section.
In the Indentation section, select the Special: dropdown menu and choose Hanging.
Select OK to apply the hanging indents.
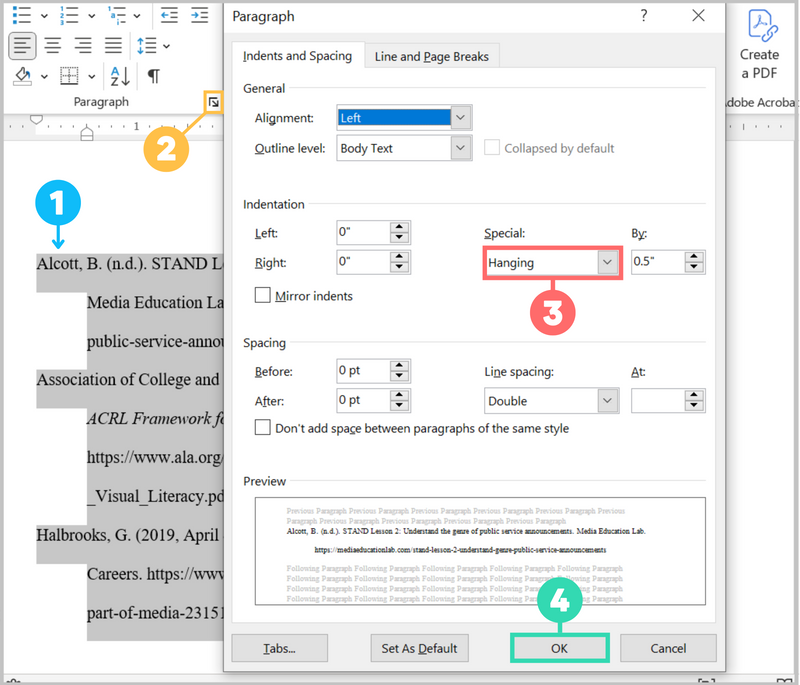 Image created by the author with Microsoft Word and Canva. To hear an audio description of the image, click play on the audio player below:
Styles 🖌️
Using Styles will allow you to apply hanging indents to any text with only a click.
Once you add hanging indents, highlight the formatted section and select the down-pointing arrow on the Styles group on the ribbon.
Select Create a Style, then name and save the new style. It will show up as a new option in the Styles gallery.
 Image created by the author with Microsoft Word and Canva. To hear an audio description of the image, click play on the audio player below:
Quiz
Aidan is using Microsoft Word to format reference lists in five different papers. What is the quickest, most efficient way for him to add hanging indents?
Did you know?
Hanging Indents in Google Docs
Hanging indents are added with the menu options or ruler rather than a keyboard shortcut. Make sure each reference is on its own line before adding hanging indents.
Menu Options 🖥️
Highlight your reference list.
Go to the Format tab and select Align & indent.
Go to Indentation options. In the Special indent dropdown menu, select Hanging.
Enter 0.5 in the box next to the dropdown menu and select Apply.
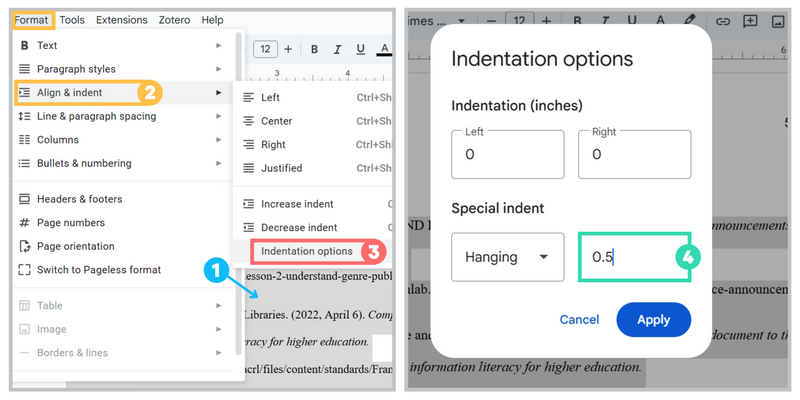 Image created by the author with Google Docs and Canva. To hear an audio description of the image, click play on the audio player below:
Ruler (Desktop Version Only) 📏
Highlight your reference list.
Drag the triangle marker to 0.5 inch, which will move all the text to that point.
Drag the rectangle marker to 0 inches to move the first lines back.
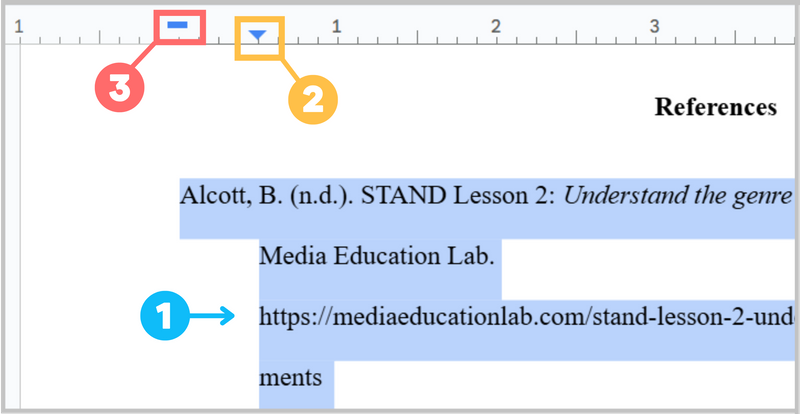 Image created by the author with Google Docs and Canva. To hear an audio description of the image, click play on the audio player below:
Subscribe for more quick bites of learning delivered to your inbox.
Unsubscribe anytime. No spam. 🙂
Take Action

Your feedback matters to us.
This Byte helped me better understand the topic.