Are you struggling to hear back from the jobs you're applying to? Are you worried that your current resume doesn't highlight who you are and how your experience is relevant to this position?
Then maybe it's time to reformat your resume into a reverse chronological resume!
Why a Resume in Reverse Chronological Order?
The reverse chronological resume highlights your work experience and shows a clear career progression. It's recommended for anyone who's working in their desired career path, or has a consistent work history in their field.
This is because it starts by highlighting your latest, relevant work experience first, and then moving backwards to your older work experience, creating a consistent narrative.

What are the benefits?
A reverse chronological resume:
Highlights your experience and work history
Shows how your current skills are relevant to the new role.
Emphasizes consistency and progression through your career path.
Simplifies the process for recruiters.
Formatting a Reverse Chronological Resume

Structure your reverse chronological resume with these sections, in this order:
Header (your name and contact information)
Professional Summary
Work Experience
Educational Background
Relevant Skills
Additional Sections (Certifications, Volunteer work, Publications, etc.)
Remember, a well-formatted resume could quickly catch a recruiter's attention!
Putting the Pieces Together

1. Header
Your name
Latest contact information
You could center this and put it at the very top.
 Images in this section created by the author using Microsoft Word and Snipping Tool. To hear an audio version of the information in these images, click the play button on the audio player below each image:

2. Professional Summary
This serves as an introduction to the hiring manager about:
Who you are
Your relevant skills
Why you'd be a great fit for this role
You could also state your professional objective in this section.


3. Work Experience
Put down your relevant work experience in reverse chronological order, starting with your most recent position. Try to only include your relevant work experience. Don't include jobs that aren't relevant to this next position.
Include:
Your official title
The company name
Location of the job
Dates you worked there (months and years only)
A few bullet points highlighting your role, responsibilities, and accomplishments


4. Educational Background
This section only needs to be brief, especially if you've completed your college degree. If not, it's recommended you put your high school information with extra details. This can include your GPA, relevant coursework, and awards.
You should include:
School/University name
School/University location
Dates you attended (Months and years only — if you haven't finished, put your expected graduation date)
The degree you received


5. Relevant Skills
List any skills that are relevant to the role you're applying for.


6. Additional Sections
This can include things like volunteer work, certifications, and professional awards — anything you feel is relevant but wouldn't fit in the other sections.

Example Resume
Here's what that reverse chronological resume would look like put all together!
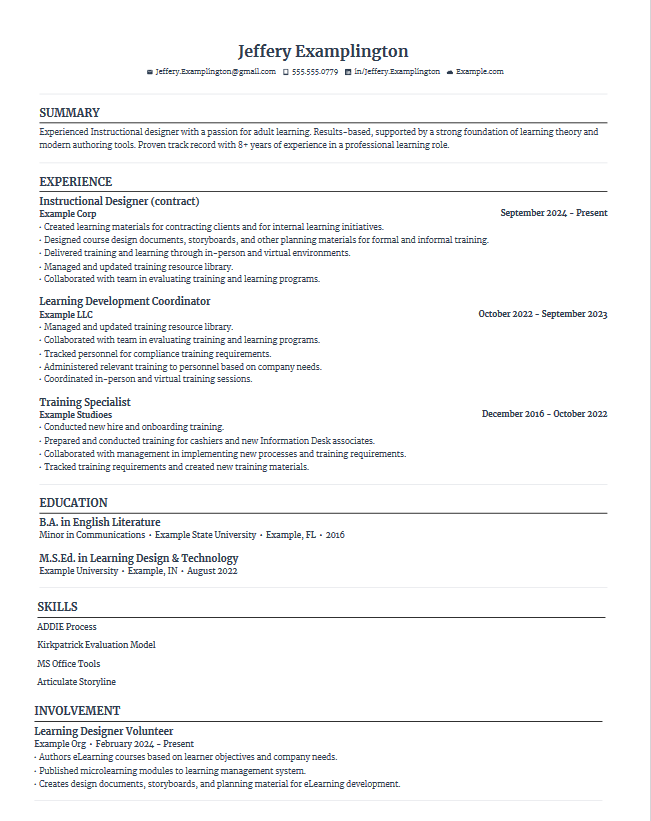 To hear an audio version of the full resume above, click the play button on the audio player below:
Quiz
When might a reverse chronological resume NOT be appropriate to use? Select all that apply:
Take Action

Now that you know what a reverse chronological resume looks like, do you think it's the right choice for you? When writing a reverse chronological order resume, remember to:
Your feedback matters to us.
This Byte helped me better understand the topic.
